Creating a product feed channel in Pricefy takes eight steps, from choosing the destination to publishing the feed. This guide walks you through each one, with the settings you’ll meet along the way.
For an overview of the Channels page and how to manage existing channels, see Channels: export your catalog as product feeds.
Start a new product feed channel
Click Channels in the sidebar, then Create Channel at the top right. If you have no channels yet, the wizard opens straight away.
The steps are listed on the right. Use Next and Back to move between them, or click a step you have already completed. Nothing is saved until you click Finish & publish on the last step.
Step 1 — Channels
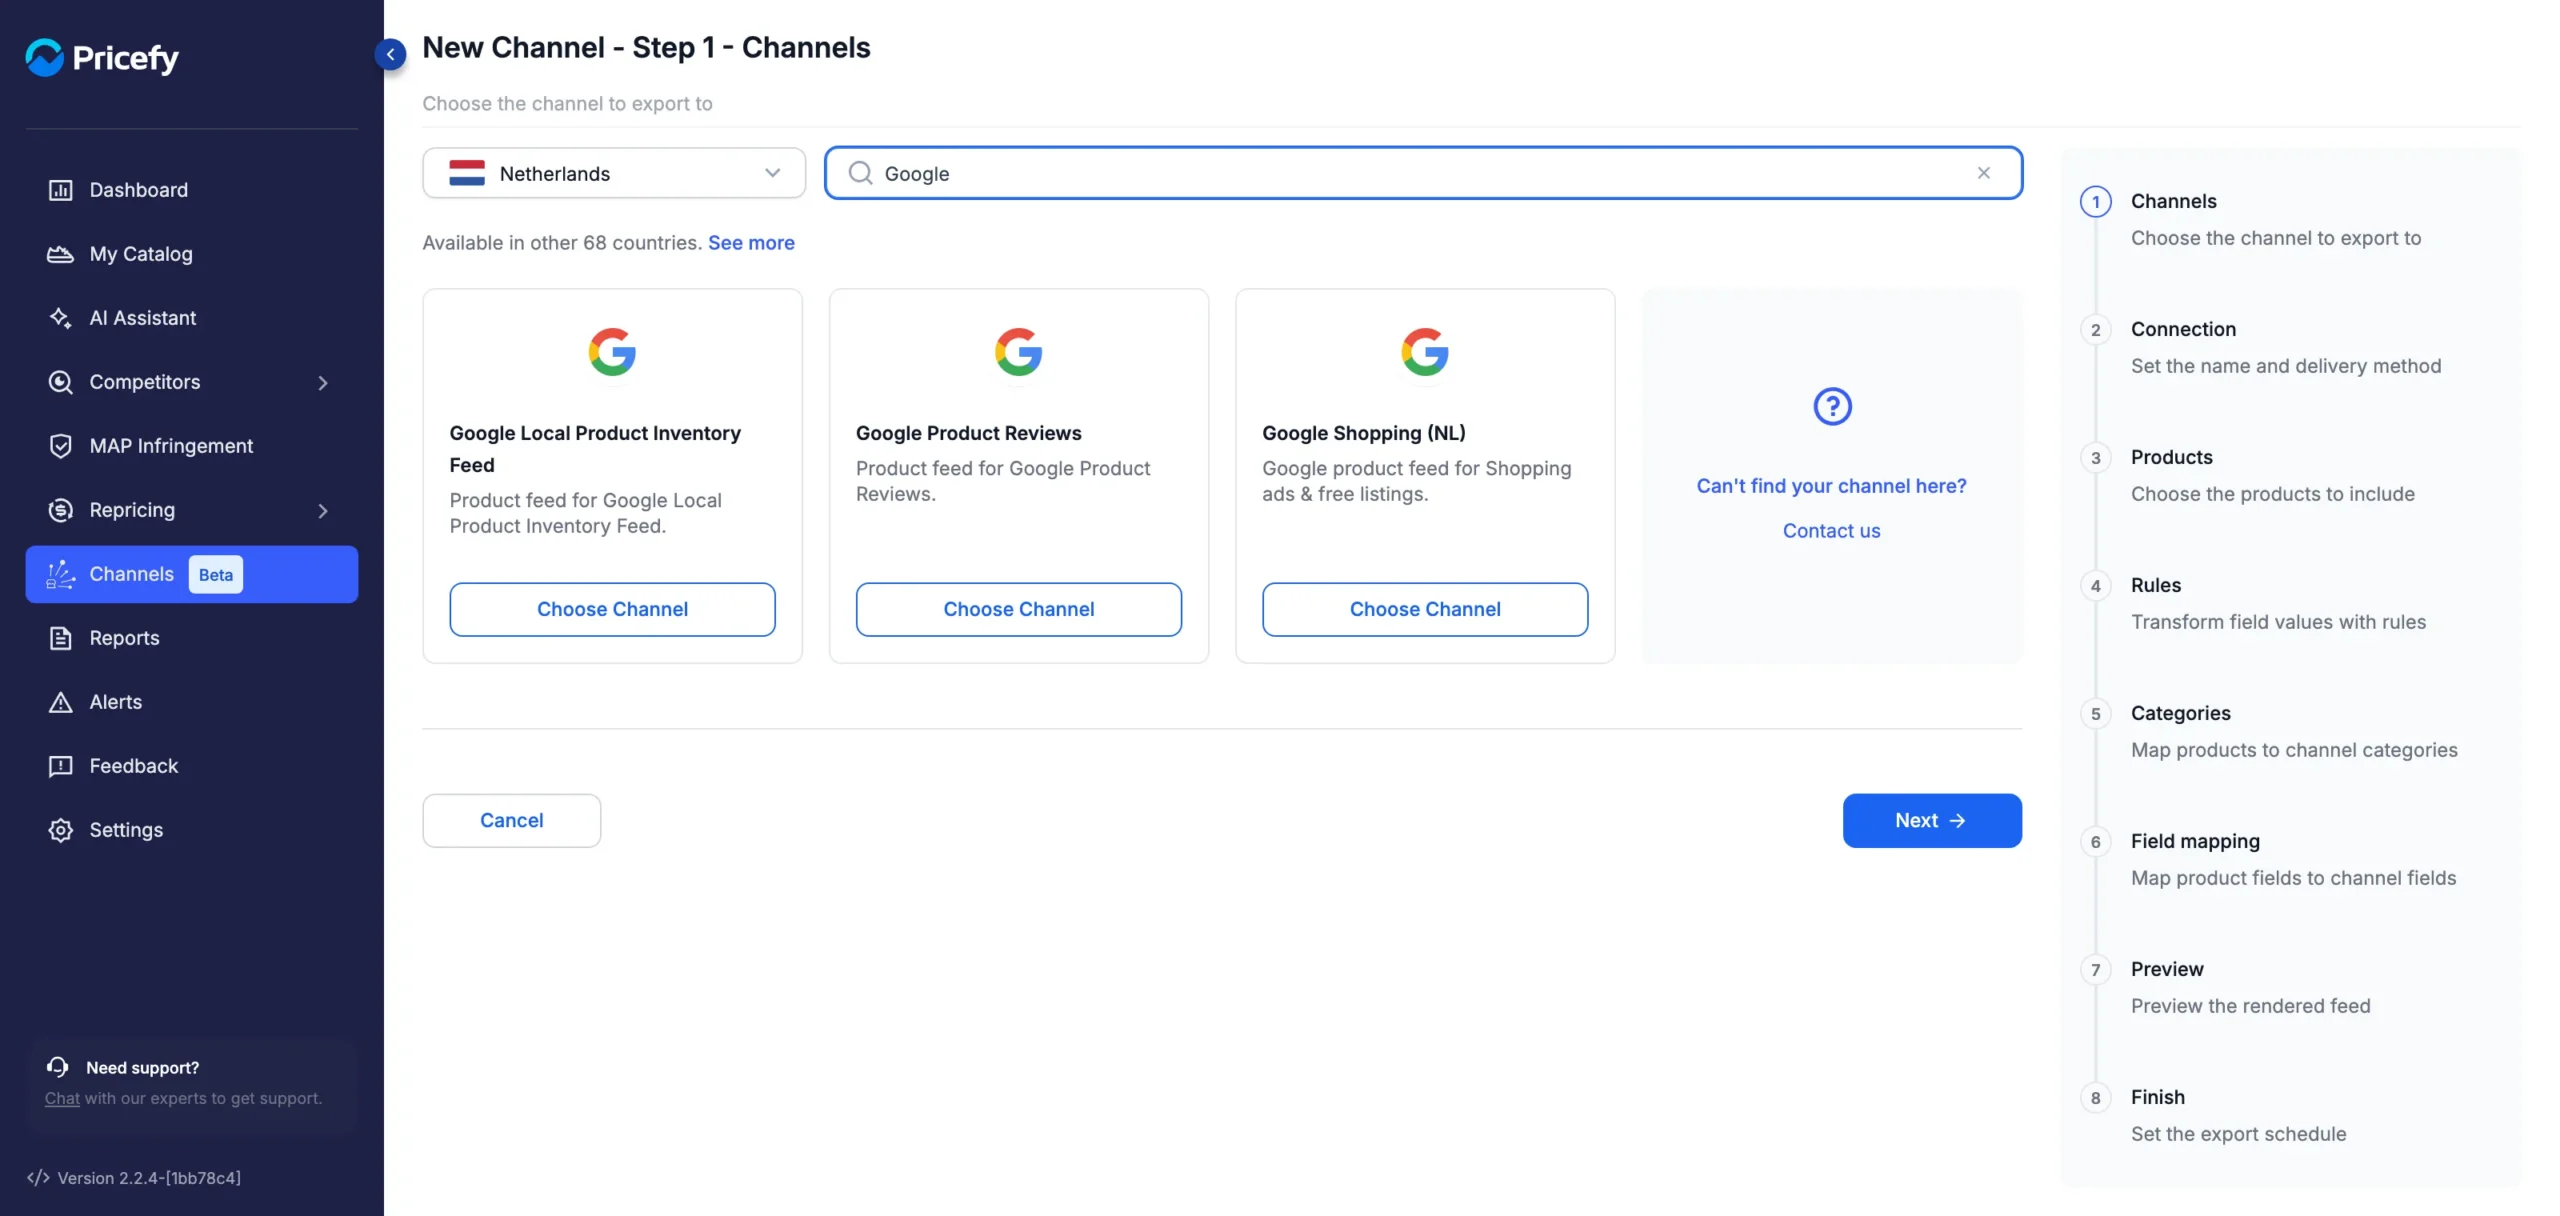
Choose where the feed goes. The list shows the channels available in your store’s country:
- Country — the selector at the top left. Change it to see the channels of another country.
- Search — type a name, such as Google, to filter the list. If it also exists in other countries, a line under the search box says where; click a country (or See more) to switch to it.
- Custom channel — always first in the list. Use it to build a CSV, XML or JSON feed with your own structure. See Custom feed: build your own CSV, XML or JSON file.
Click Choose Channel on the destination you want. If it isn’t listed, click Contact us on the Can’t find your channel here? card.
Step 2 — Connection
Name the channel and choose how the feed reaches the destination:
- Channel name — required. This is the name you’ll see in your channels list.
- Generate a feed file — already selected. Pricefy creates a file with your products.
- Output format — most channels require a specific format, which is set for you (for example XML (.xml)). For a custom channel, choose CSV, JSON or XML.
- Delivery method — Public URL, FTP, FTPS or SFTP, depending on what the channel supports.
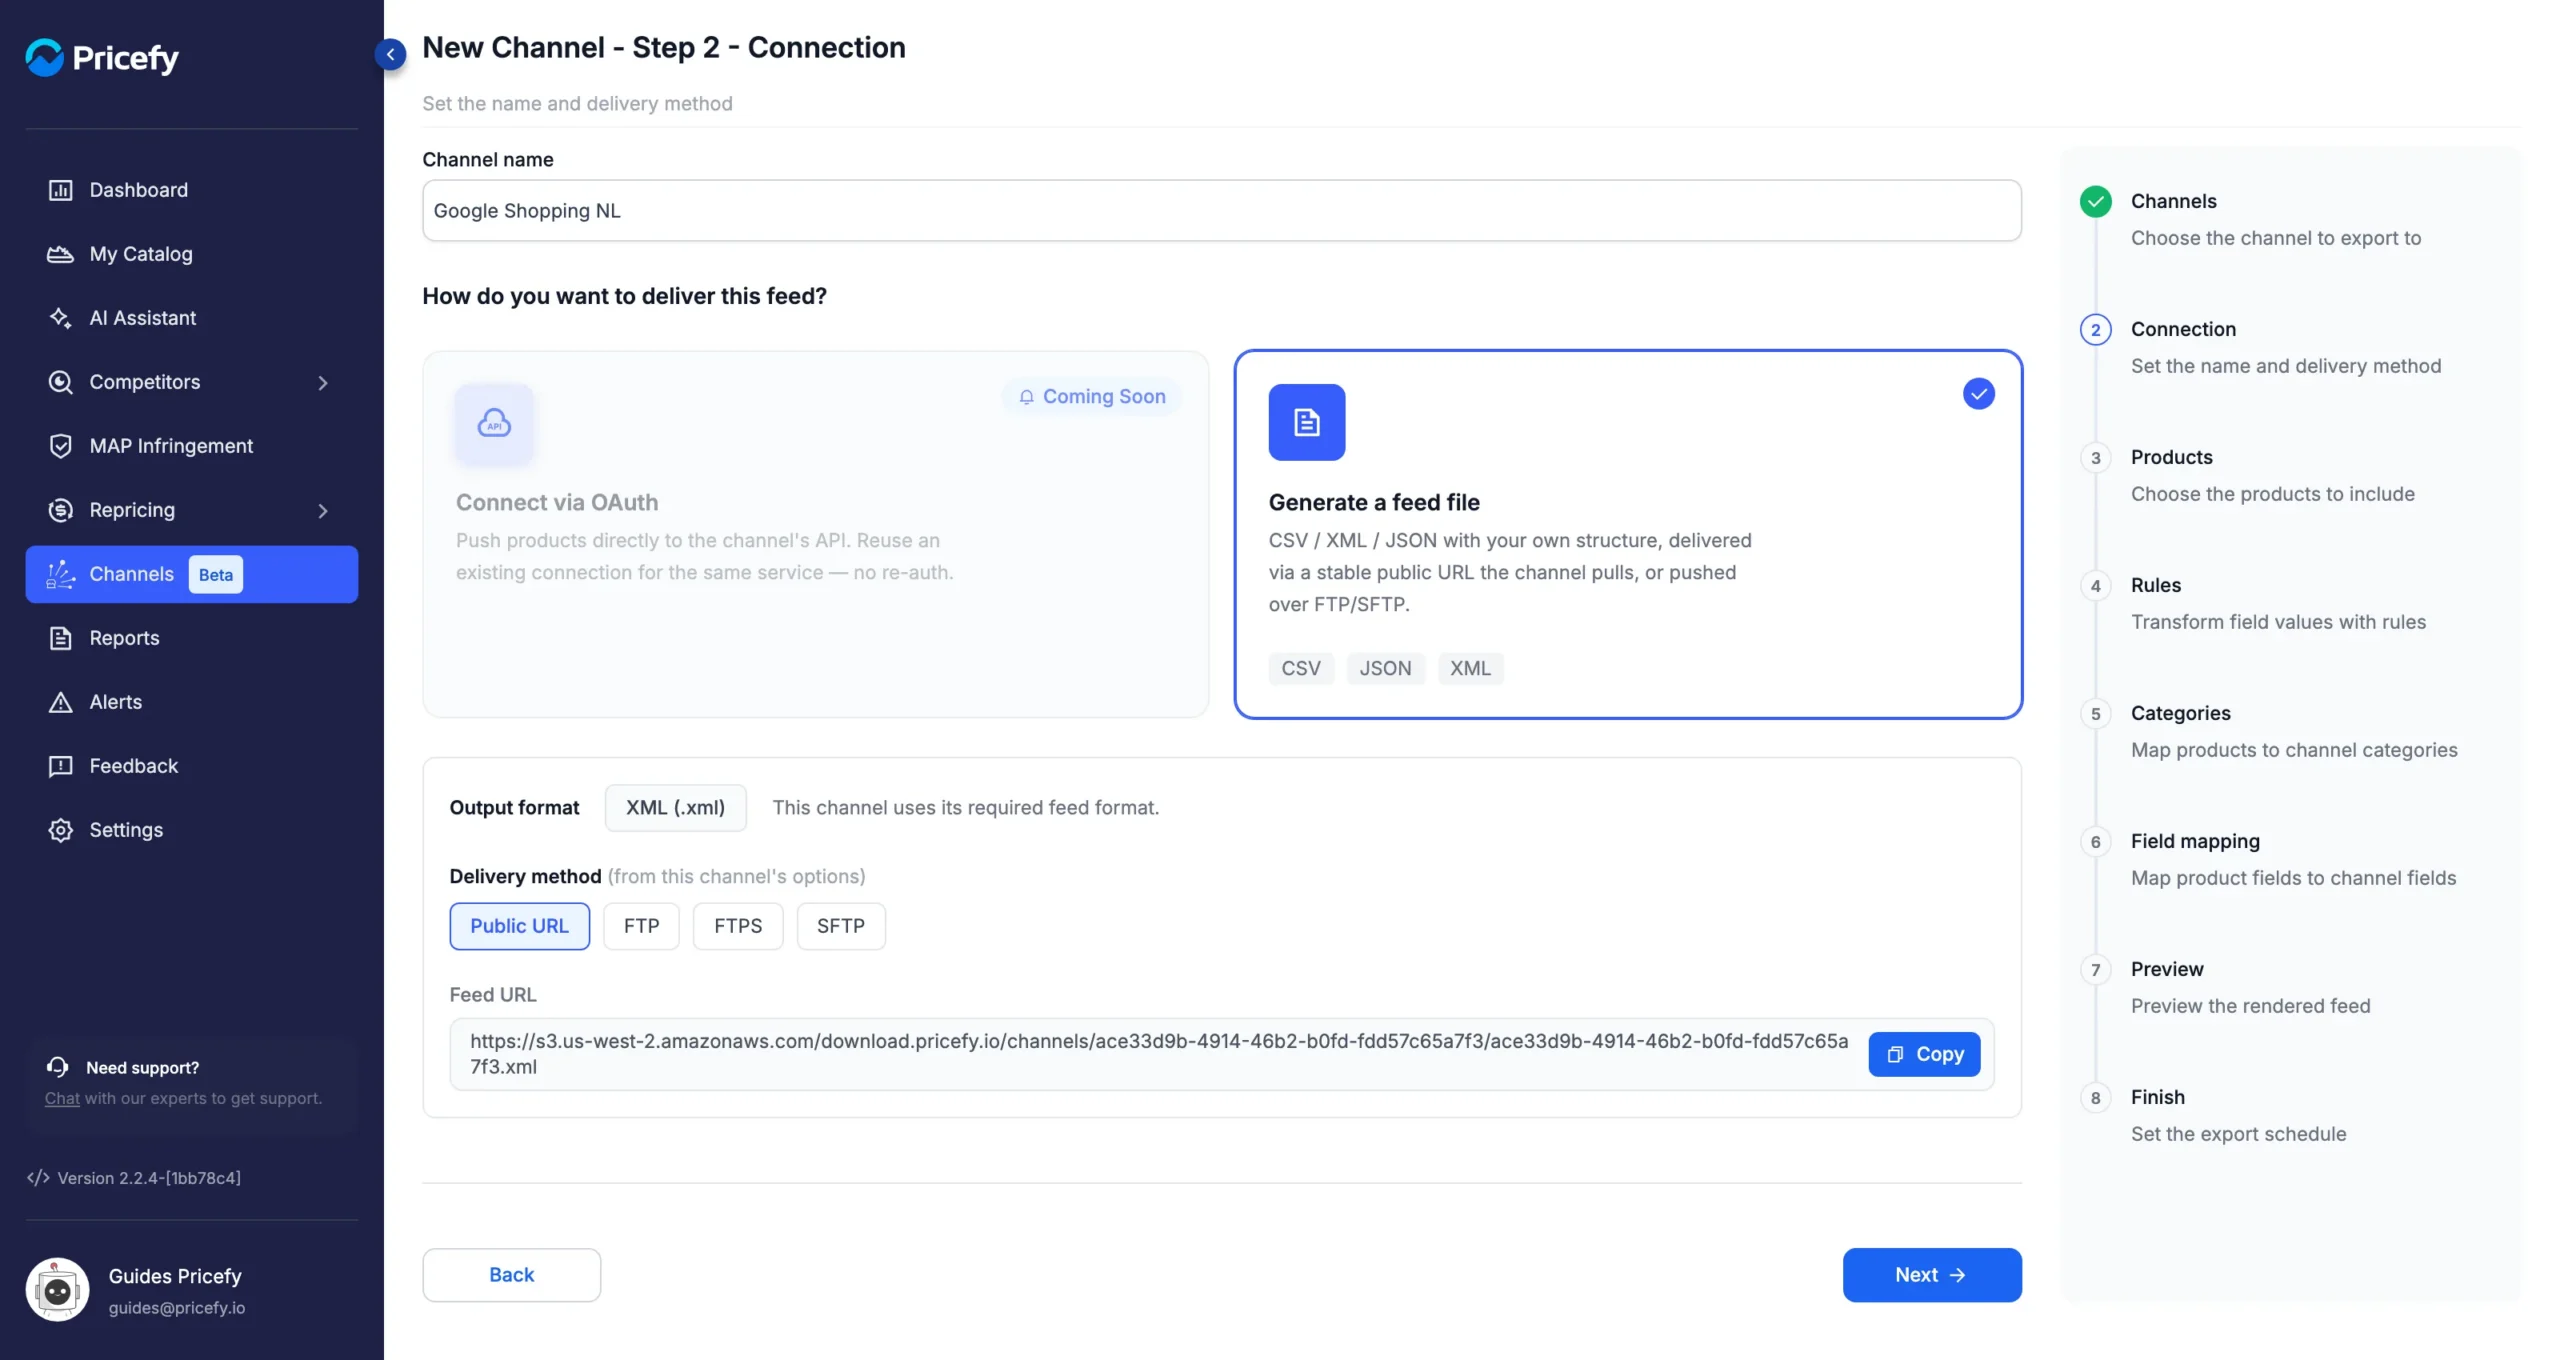
With Public URL, the Feed URL appears right away: click Copy and paste it into the destination, which downloads the file from there. The file is available after the channel’s first export.
With FTP, FTPS or SFTP, Pricefy uploads the file to a server instead. Fill in Host, Port, Username, Password, Remote path and Filename; the file extension is added for you. Each delivery method is explained in Product feed delivery: Public URL, FTP or SFTP.
Step 3 — Products
Every product is included by default. To narrow the feed down, use one of the three tabs at the top right:
- Products — pick products from the list, with the Include / Exclude switch. To select single products, first click Unselect all products, then tick the ones you want.
- Simple Filters — include the products that match one or more filters.
- Query Builder — combine several conditions. Click Preview Products to check which products match.
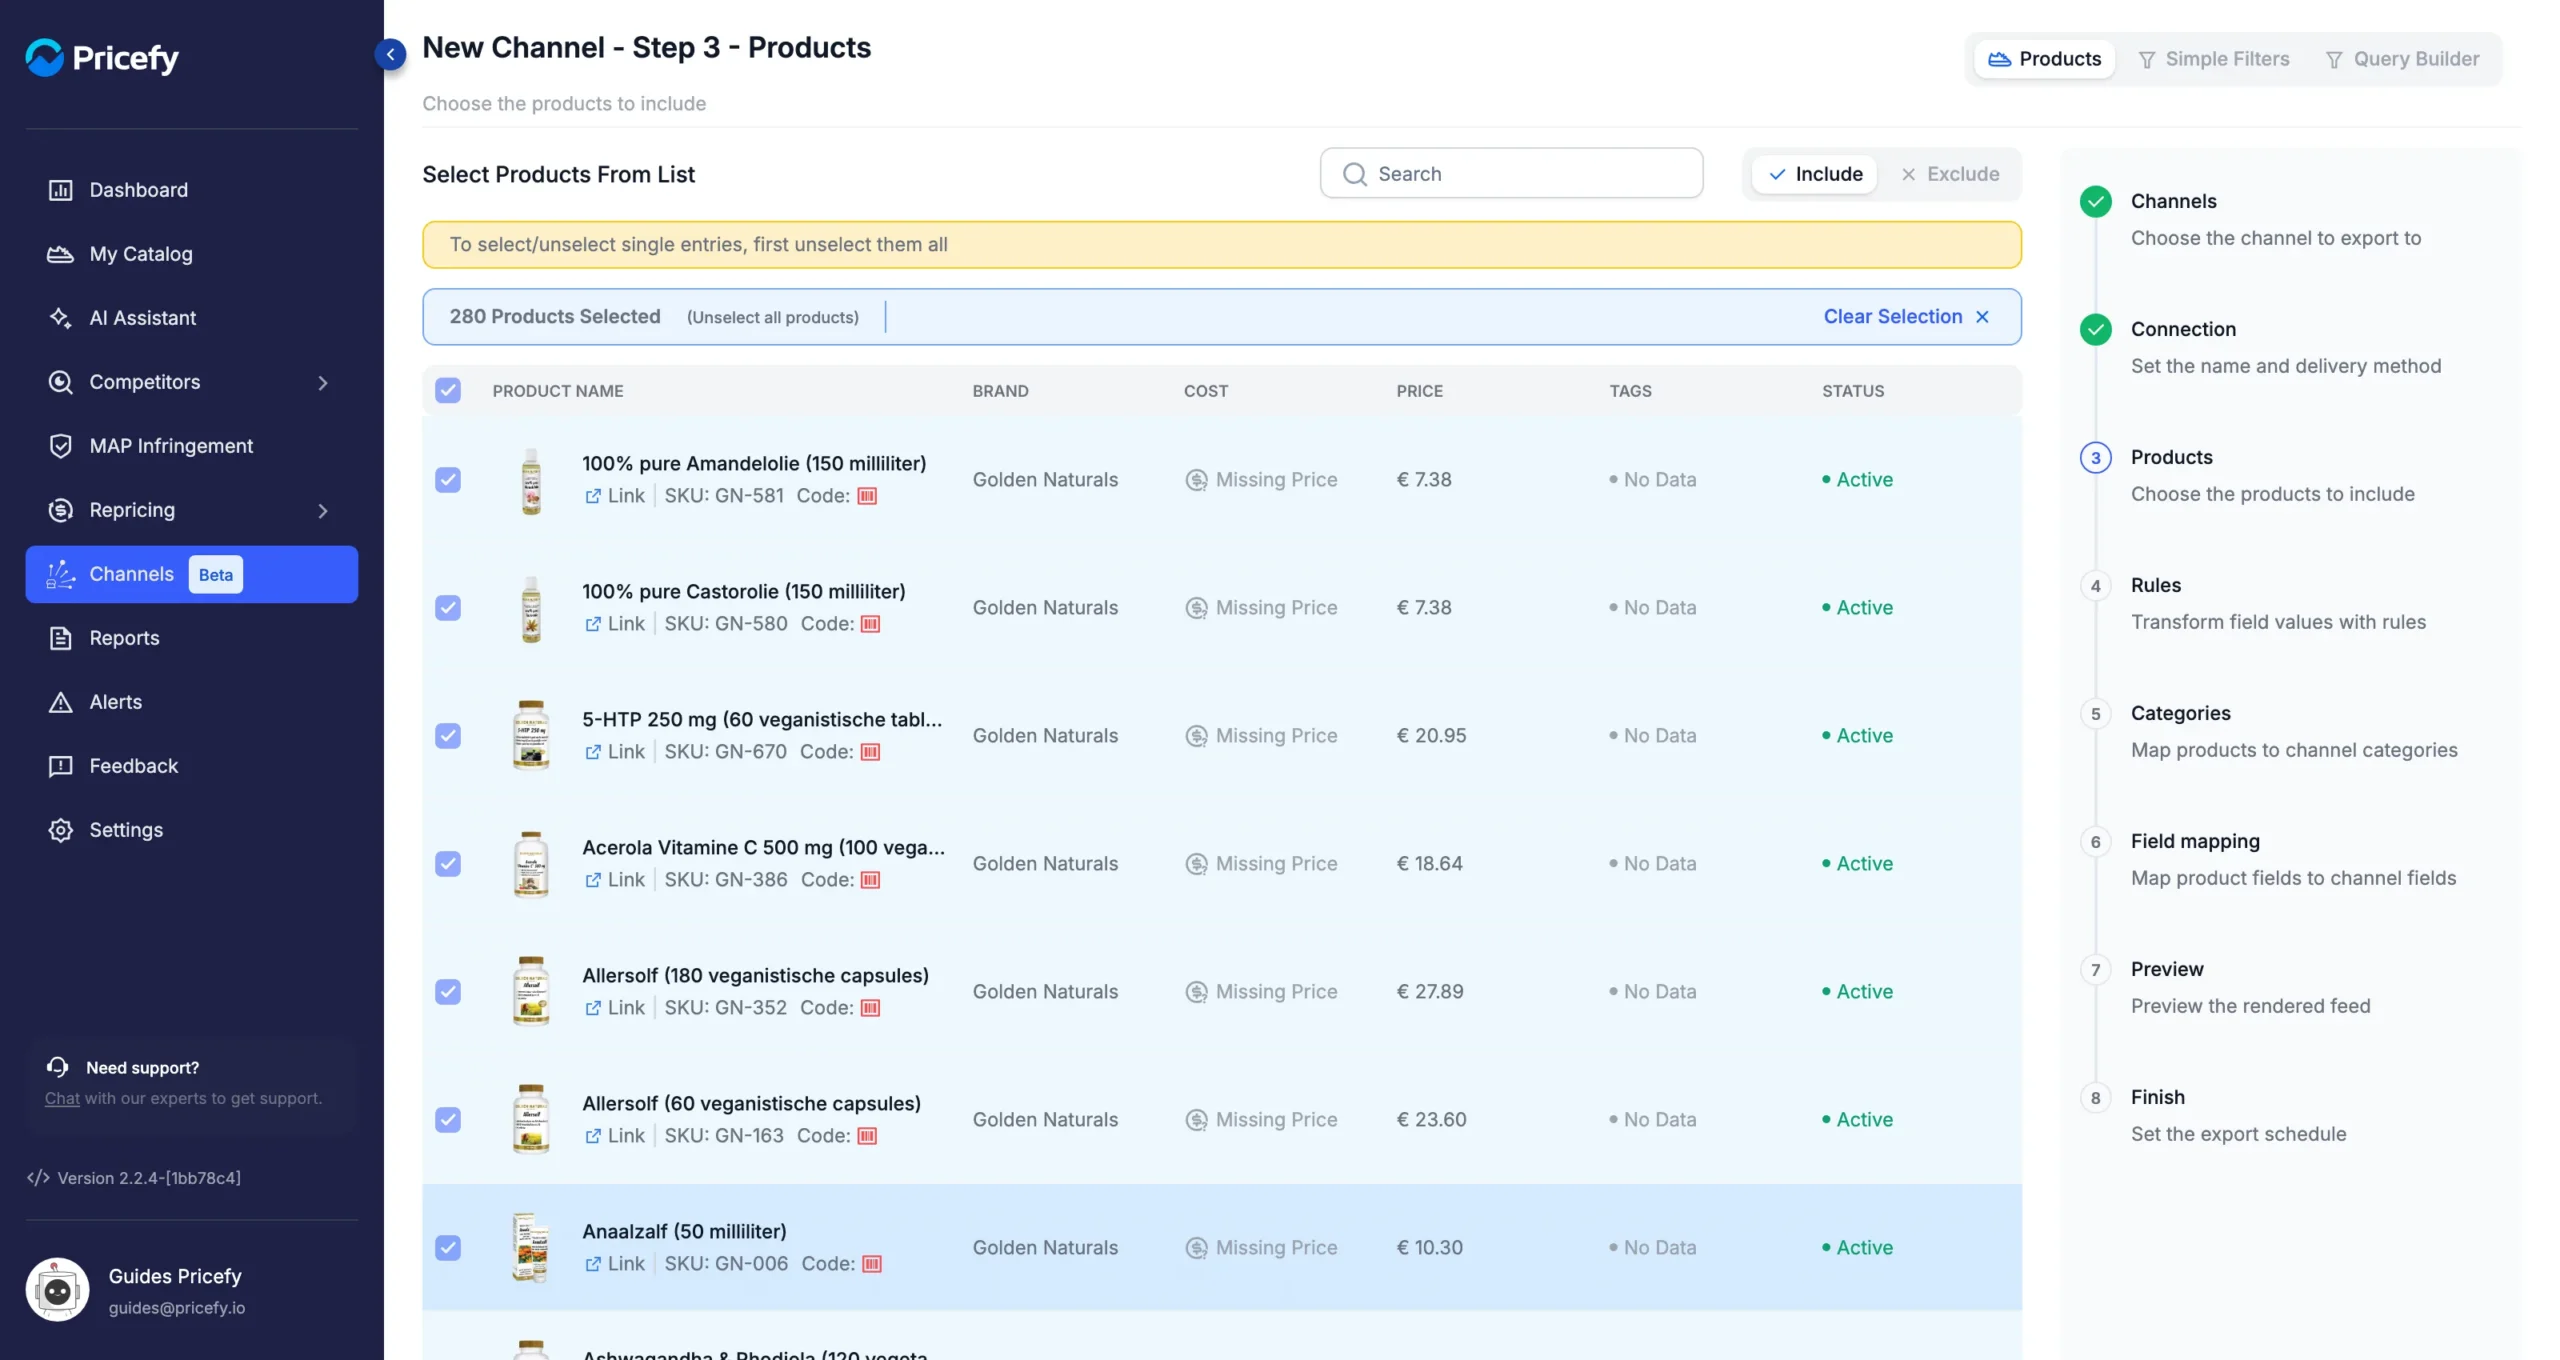
You can reuse a filter you saved in My Catalog: see How to create and save custom filters in My Catalog. Only active products are exported.
Step 4 — Rules
Feed rules are optional: without them, your products are exported as they are. Add one when a channel needs different values — for example a longer title or a rounded price. Click + Add Rule, then:
- Give the rule a Rule name (required).
- Under IF, set the conditions a product must meet. Choose All of the following or Any of the following.
- Under THEN, choose what happens to the products that match — for example Set, Append or Round a field.
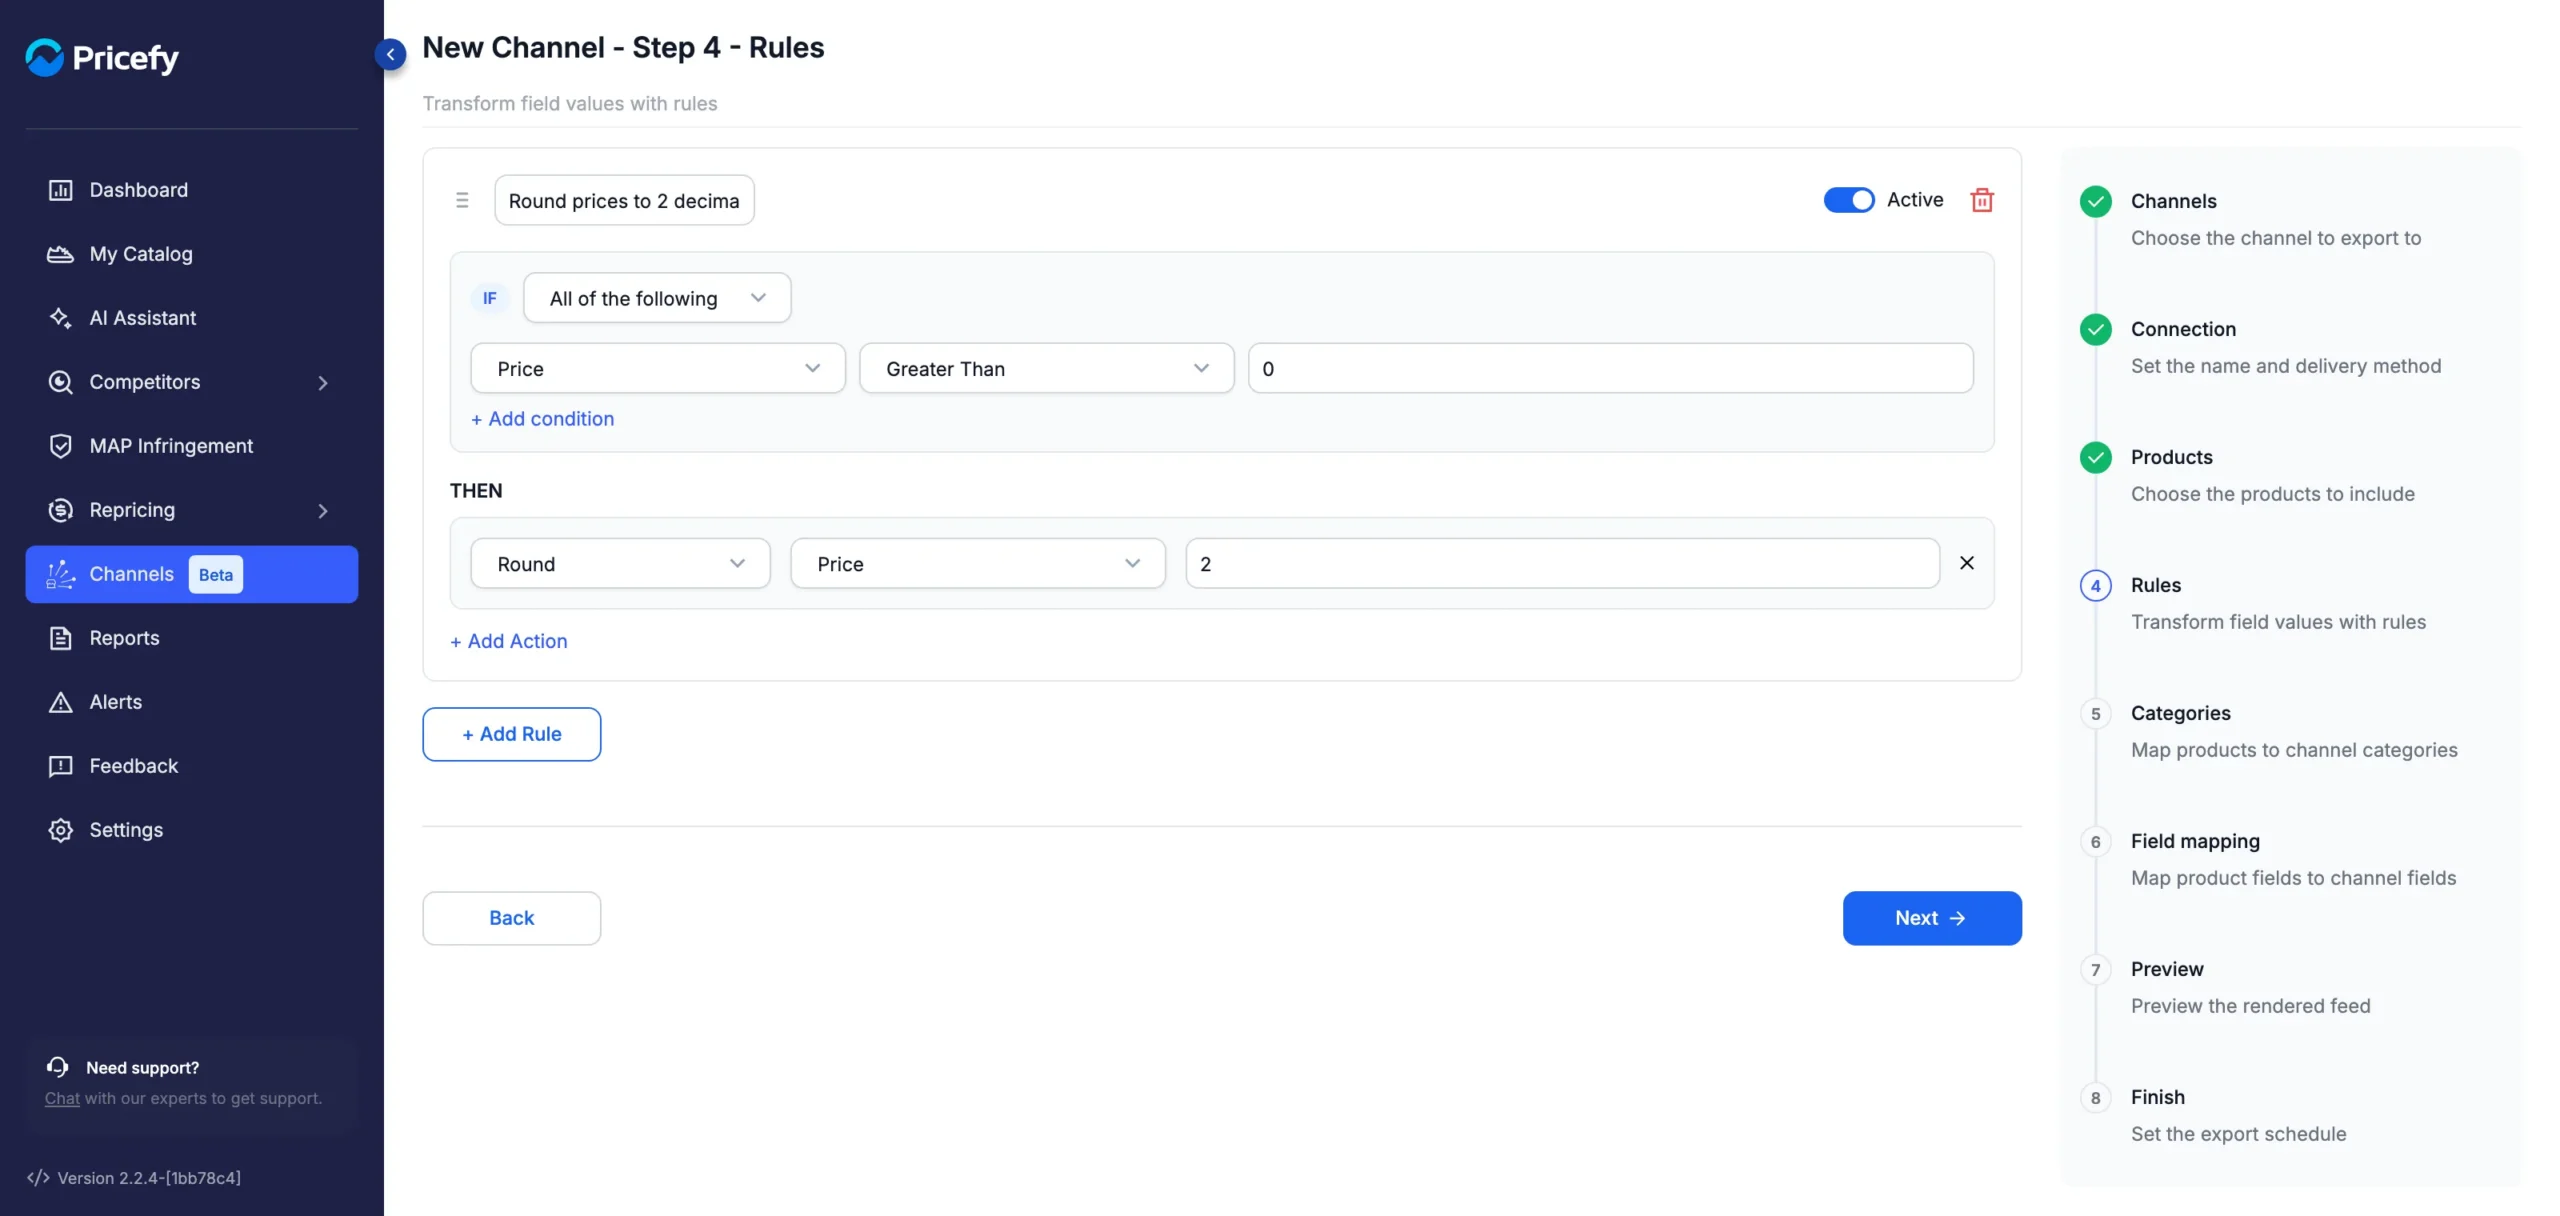
Each rule has an Active switch. When two rules change the same field, the one higher in the list wins; drag a rule by its handle to change the order. For every condition and action, see Feed rules: change prices, titles and other fields.
Step 5 — Categories
Every channel needs a default category, applied to all your products. Until you set it, a red banner stays at the top of the step. Click here in the banner, or the tag button at the top right, to open the Default category window.
Type at least three letters to search the channel’s categories, pick one and click Save. For a custom channel, you type the category yourself.
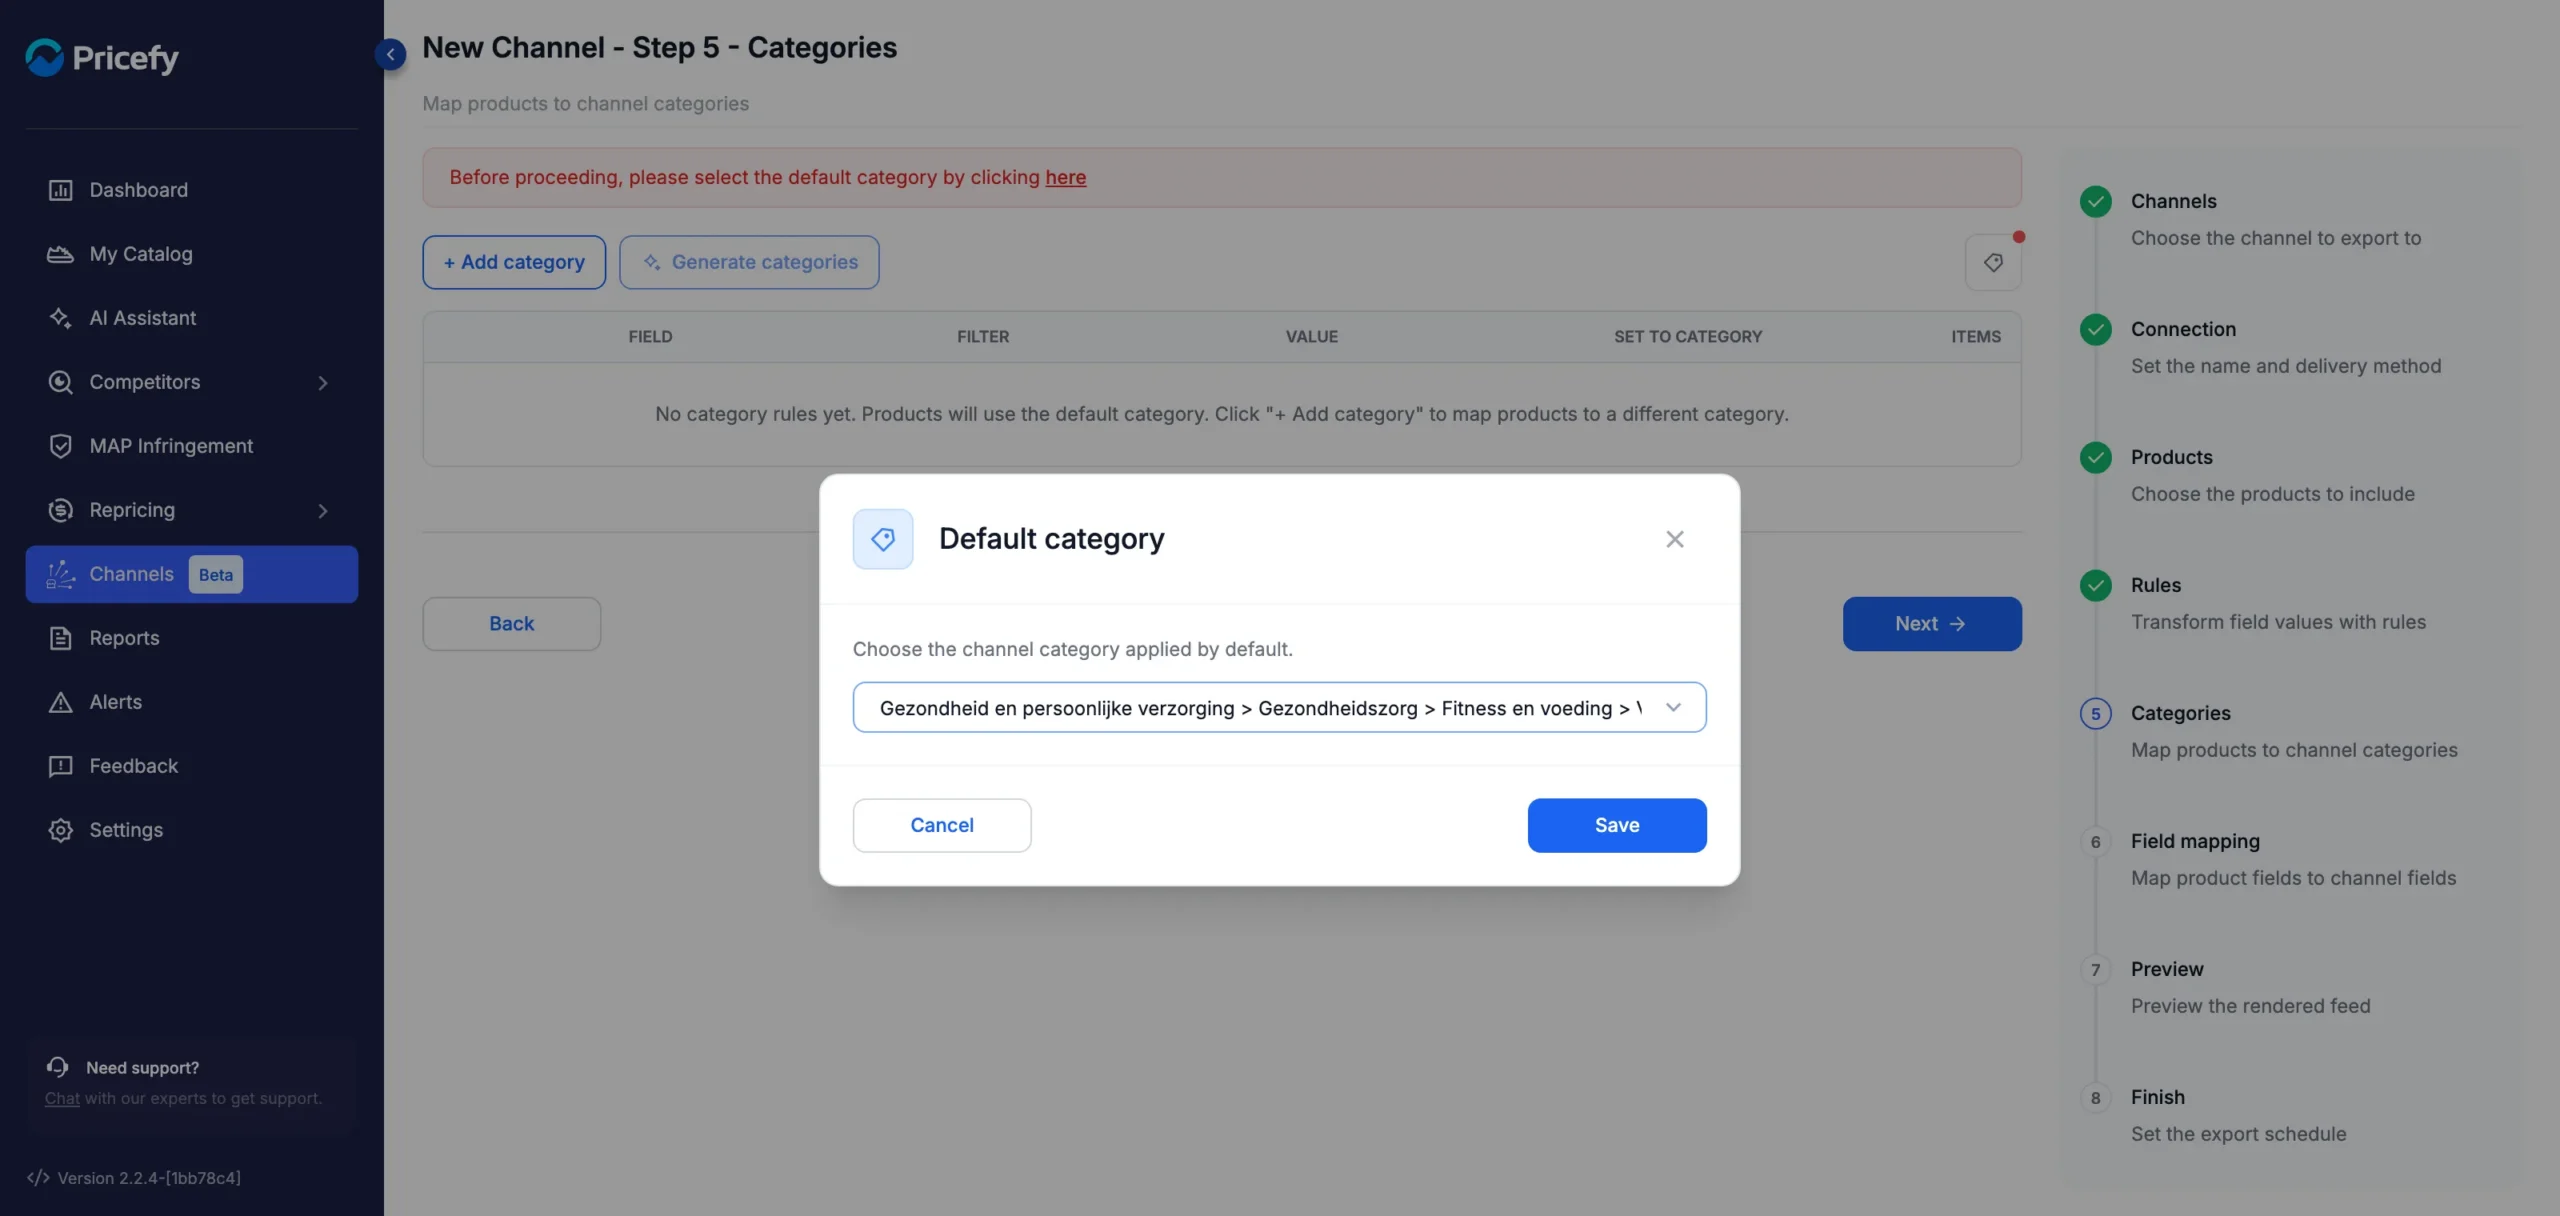
To send some products to a different category, click + Add category to add a category rule:
- Field, Filter and Value — the condition, for example Name Contains a word.
- Set to category — the category those products get.
- Items — how many products match; click View to see them.
If a product matches several category rules, the one higher in the list wins. Products that match none keep the default category. For rules with two conditions, the list of matching products and the order of the rules, see How to map products to channel categories.
Step 6 — Field mapping
Here you tell Pricefy which of your product fields fills each of the channel’s fields. Pricefy pre-fills the fields it recognizes, such as the title, price and image.
Check every row, and complete the ones marked Mandatory that are still empty — you can’t continue until they are all mapped. For each channel field you can:
- Pick a product field — from Master Fields (your catalog fields) or Additional Fields (extra attributes imported with your catalog).
- Set manual value — the same fixed value for every product.
- Clear the mapping — with the × in the field.
- Read the field’s details — the ⓘ icon next to the channel field shows what it is for and the values it accepts.
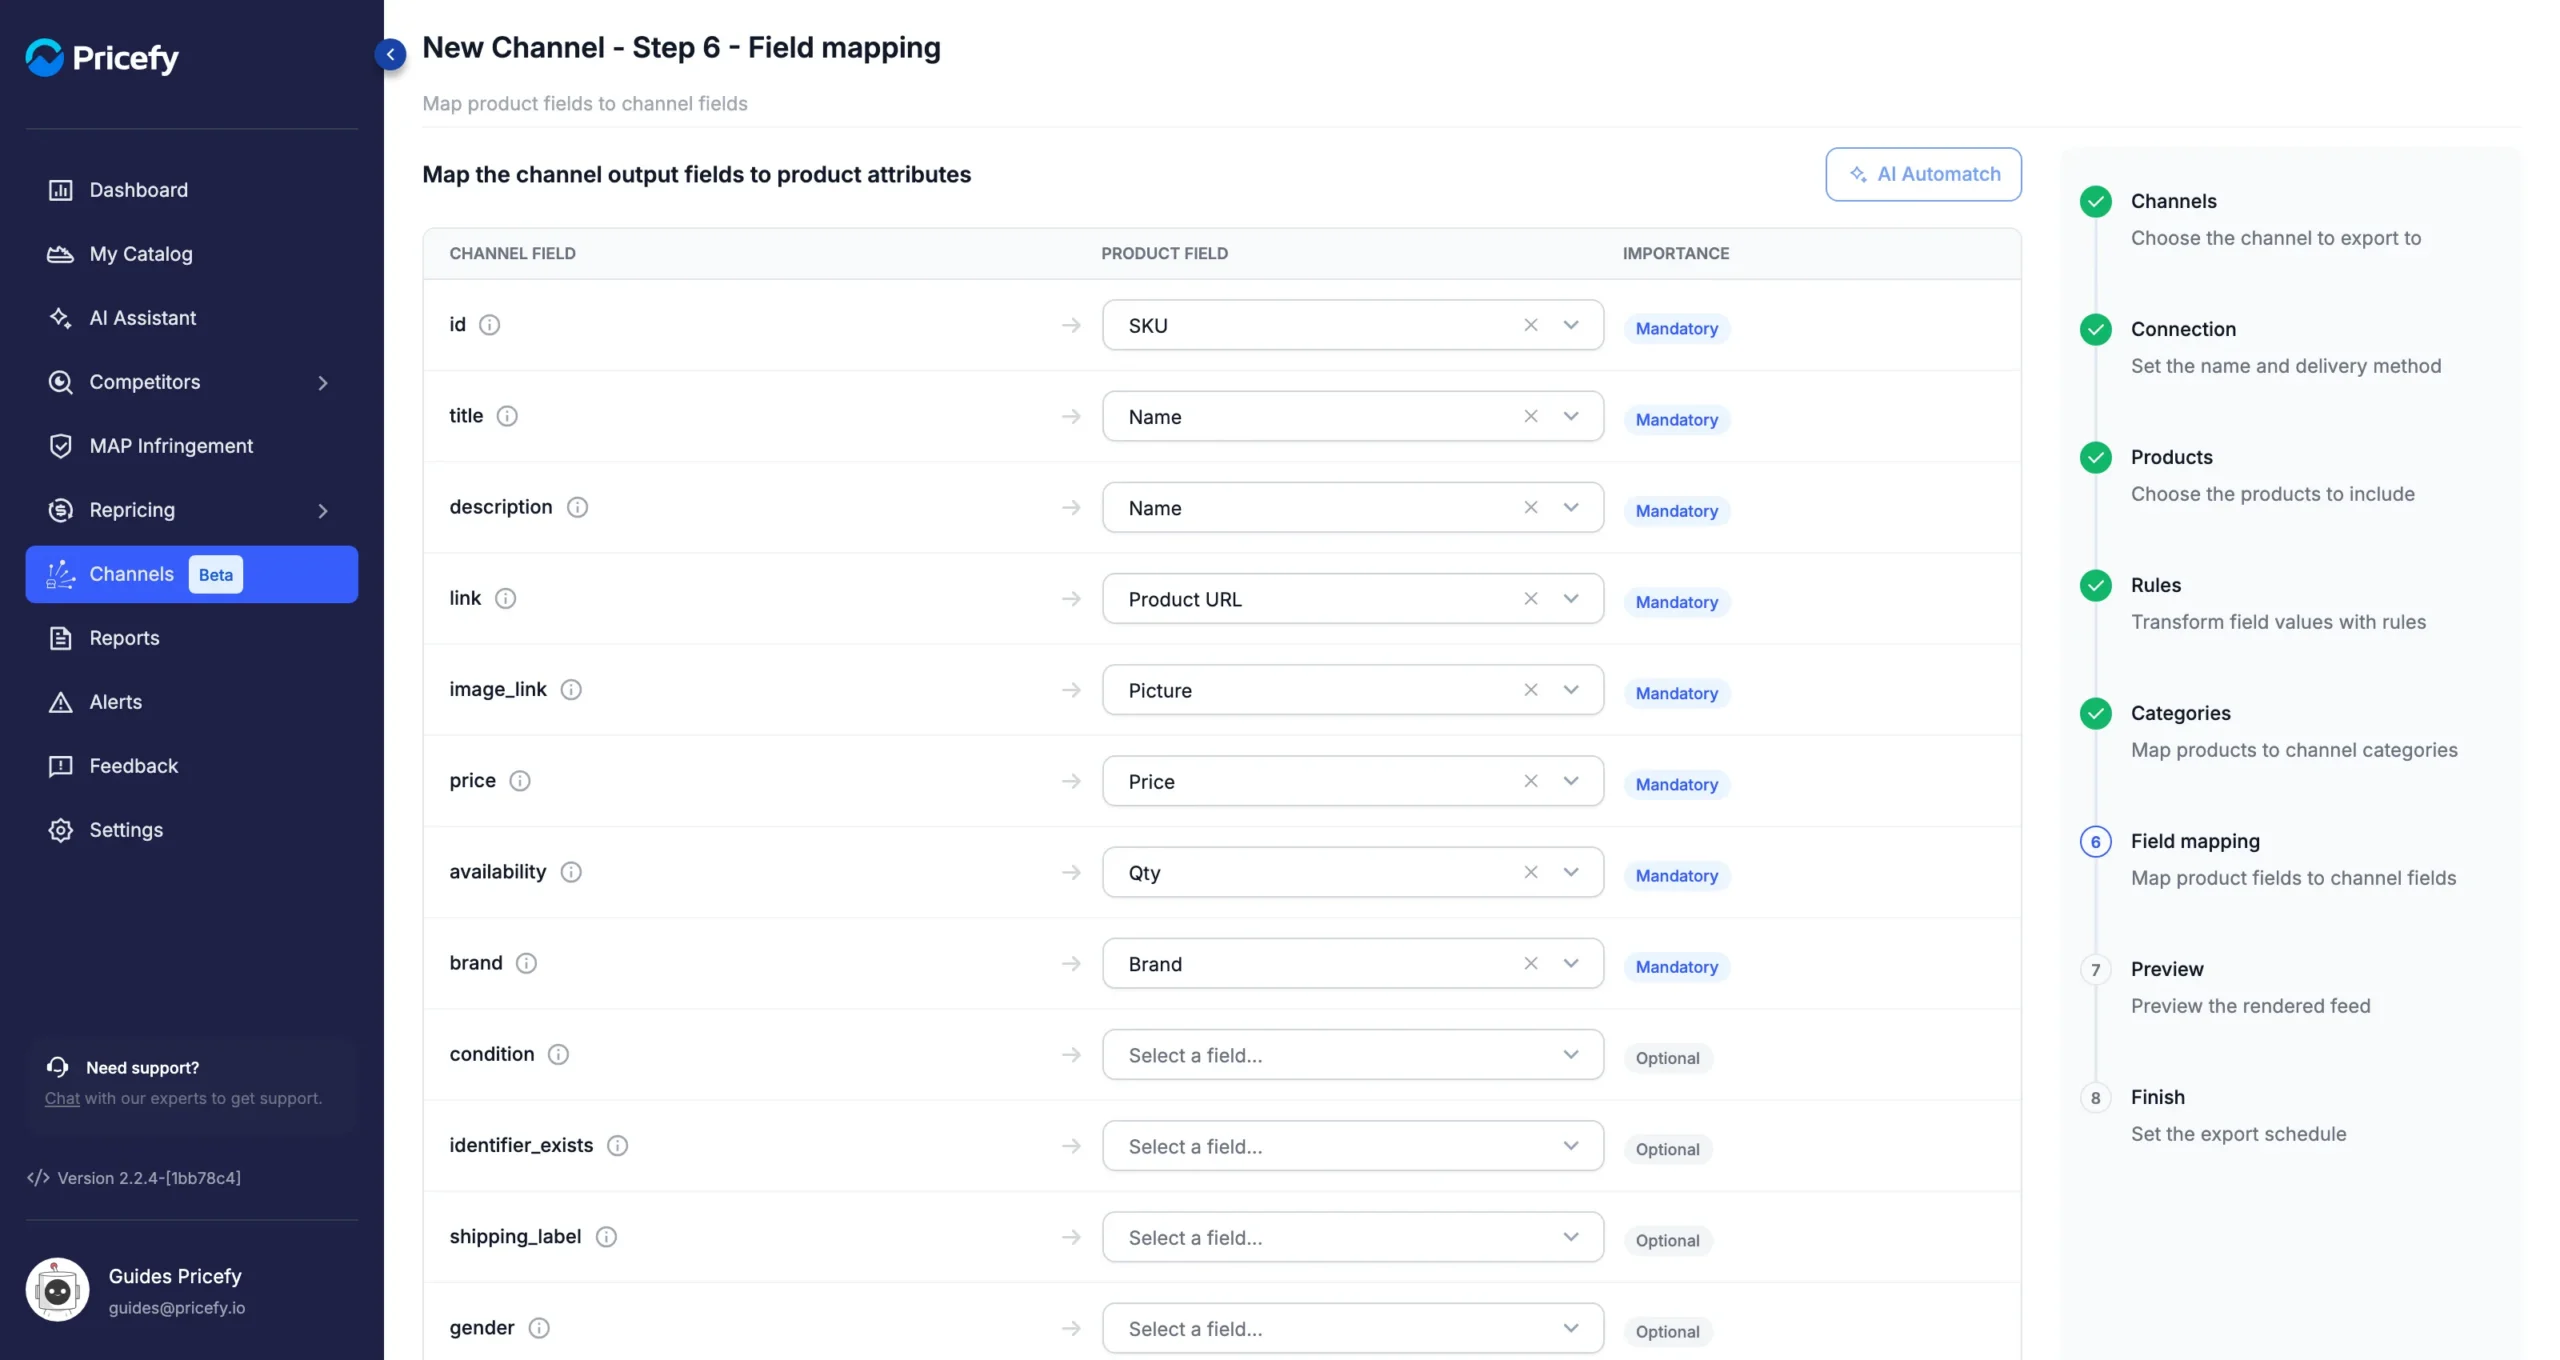
The categories you set in Step 5 reach the feed through the channel’s category field — for Google, google_product_category. Pricefy maps it to Categories for you: keep it that way, or the feed won’t carry your categories. For every option of this step, see Field mapping: map product fields to channel fields.
Step 7 — Preview
The preview shows the feed as the channel will receive it, for the first 10 products. The Status column tells you whether each product is Valid or what is wrong with it, such as a missing mandatory field.
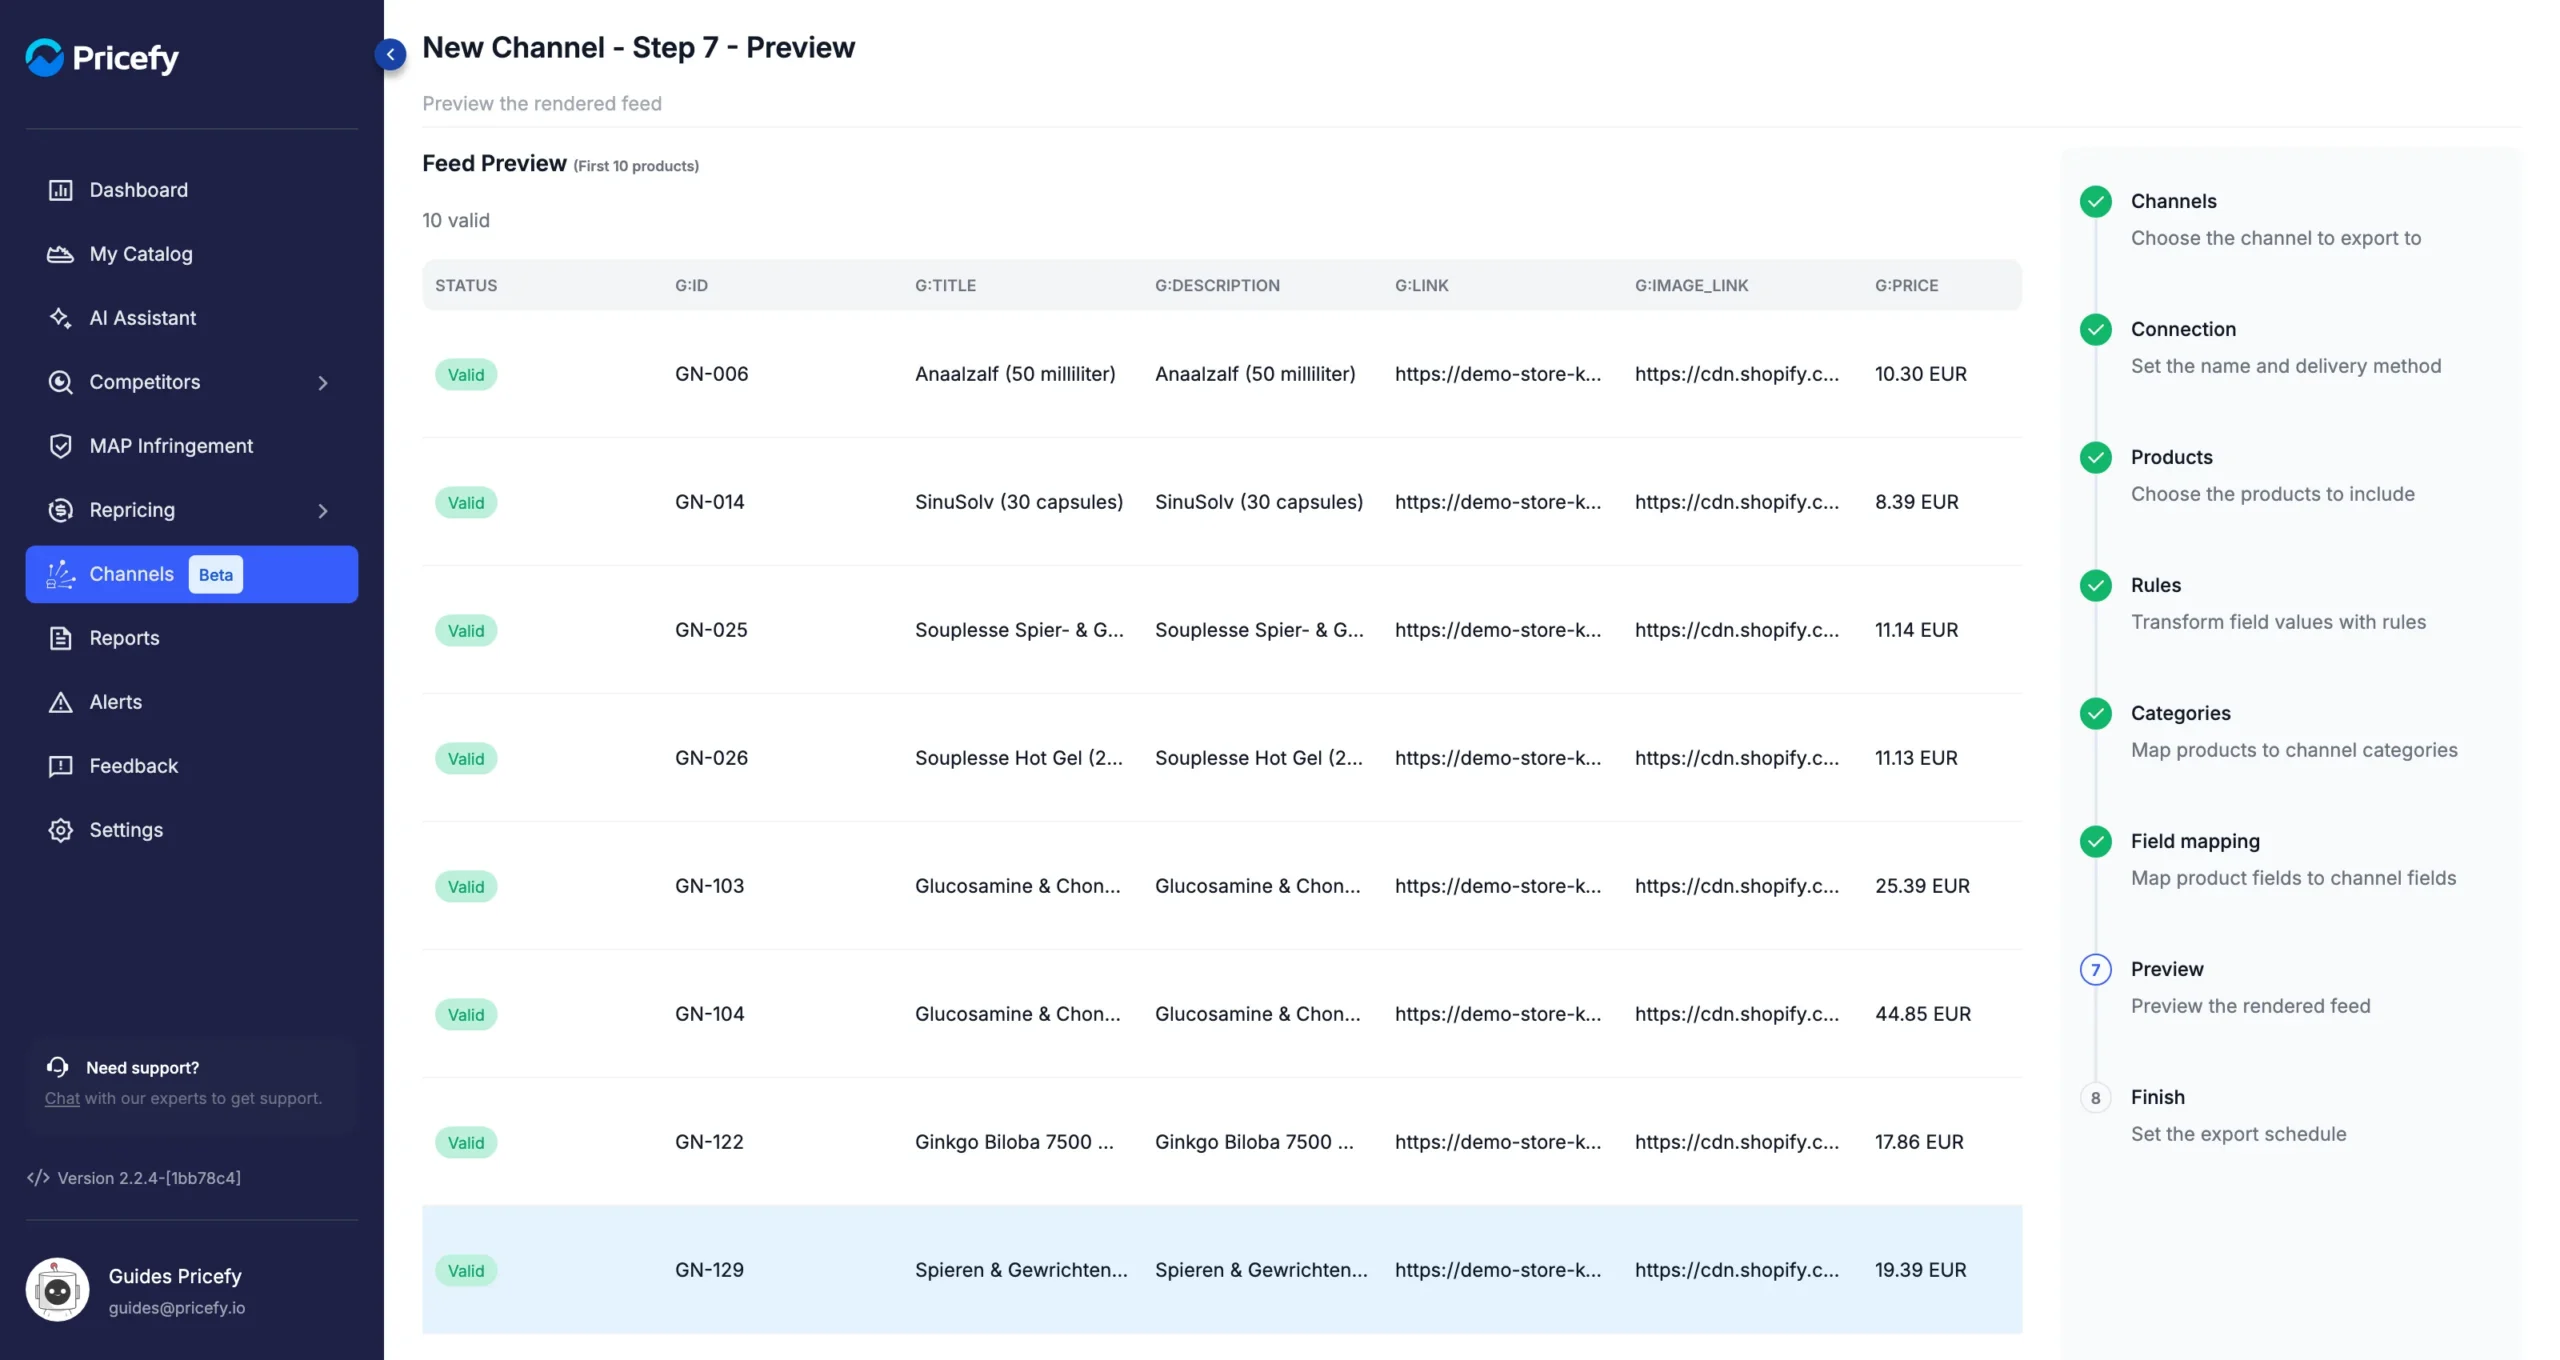
Products with an error are left out of the feed. To fix them, click Back and adjust the field mapping or the rules. For every status and how to fix it, see Feed preview: find and fix skipped products.
Step 8 — Finish
The last step sums up the channel and sets when the feed is generated. Under Export schedule, choose the Method:
- Manual — the default. The feed is generated only when you click Export Now on the Channels page.
- Automatic — the feed is regenerated on a schedule. Choose the Frequency: Every 24 hours, 48 hours, 72 hours or Weekly. The first export starts within 15 minutes of publishing.
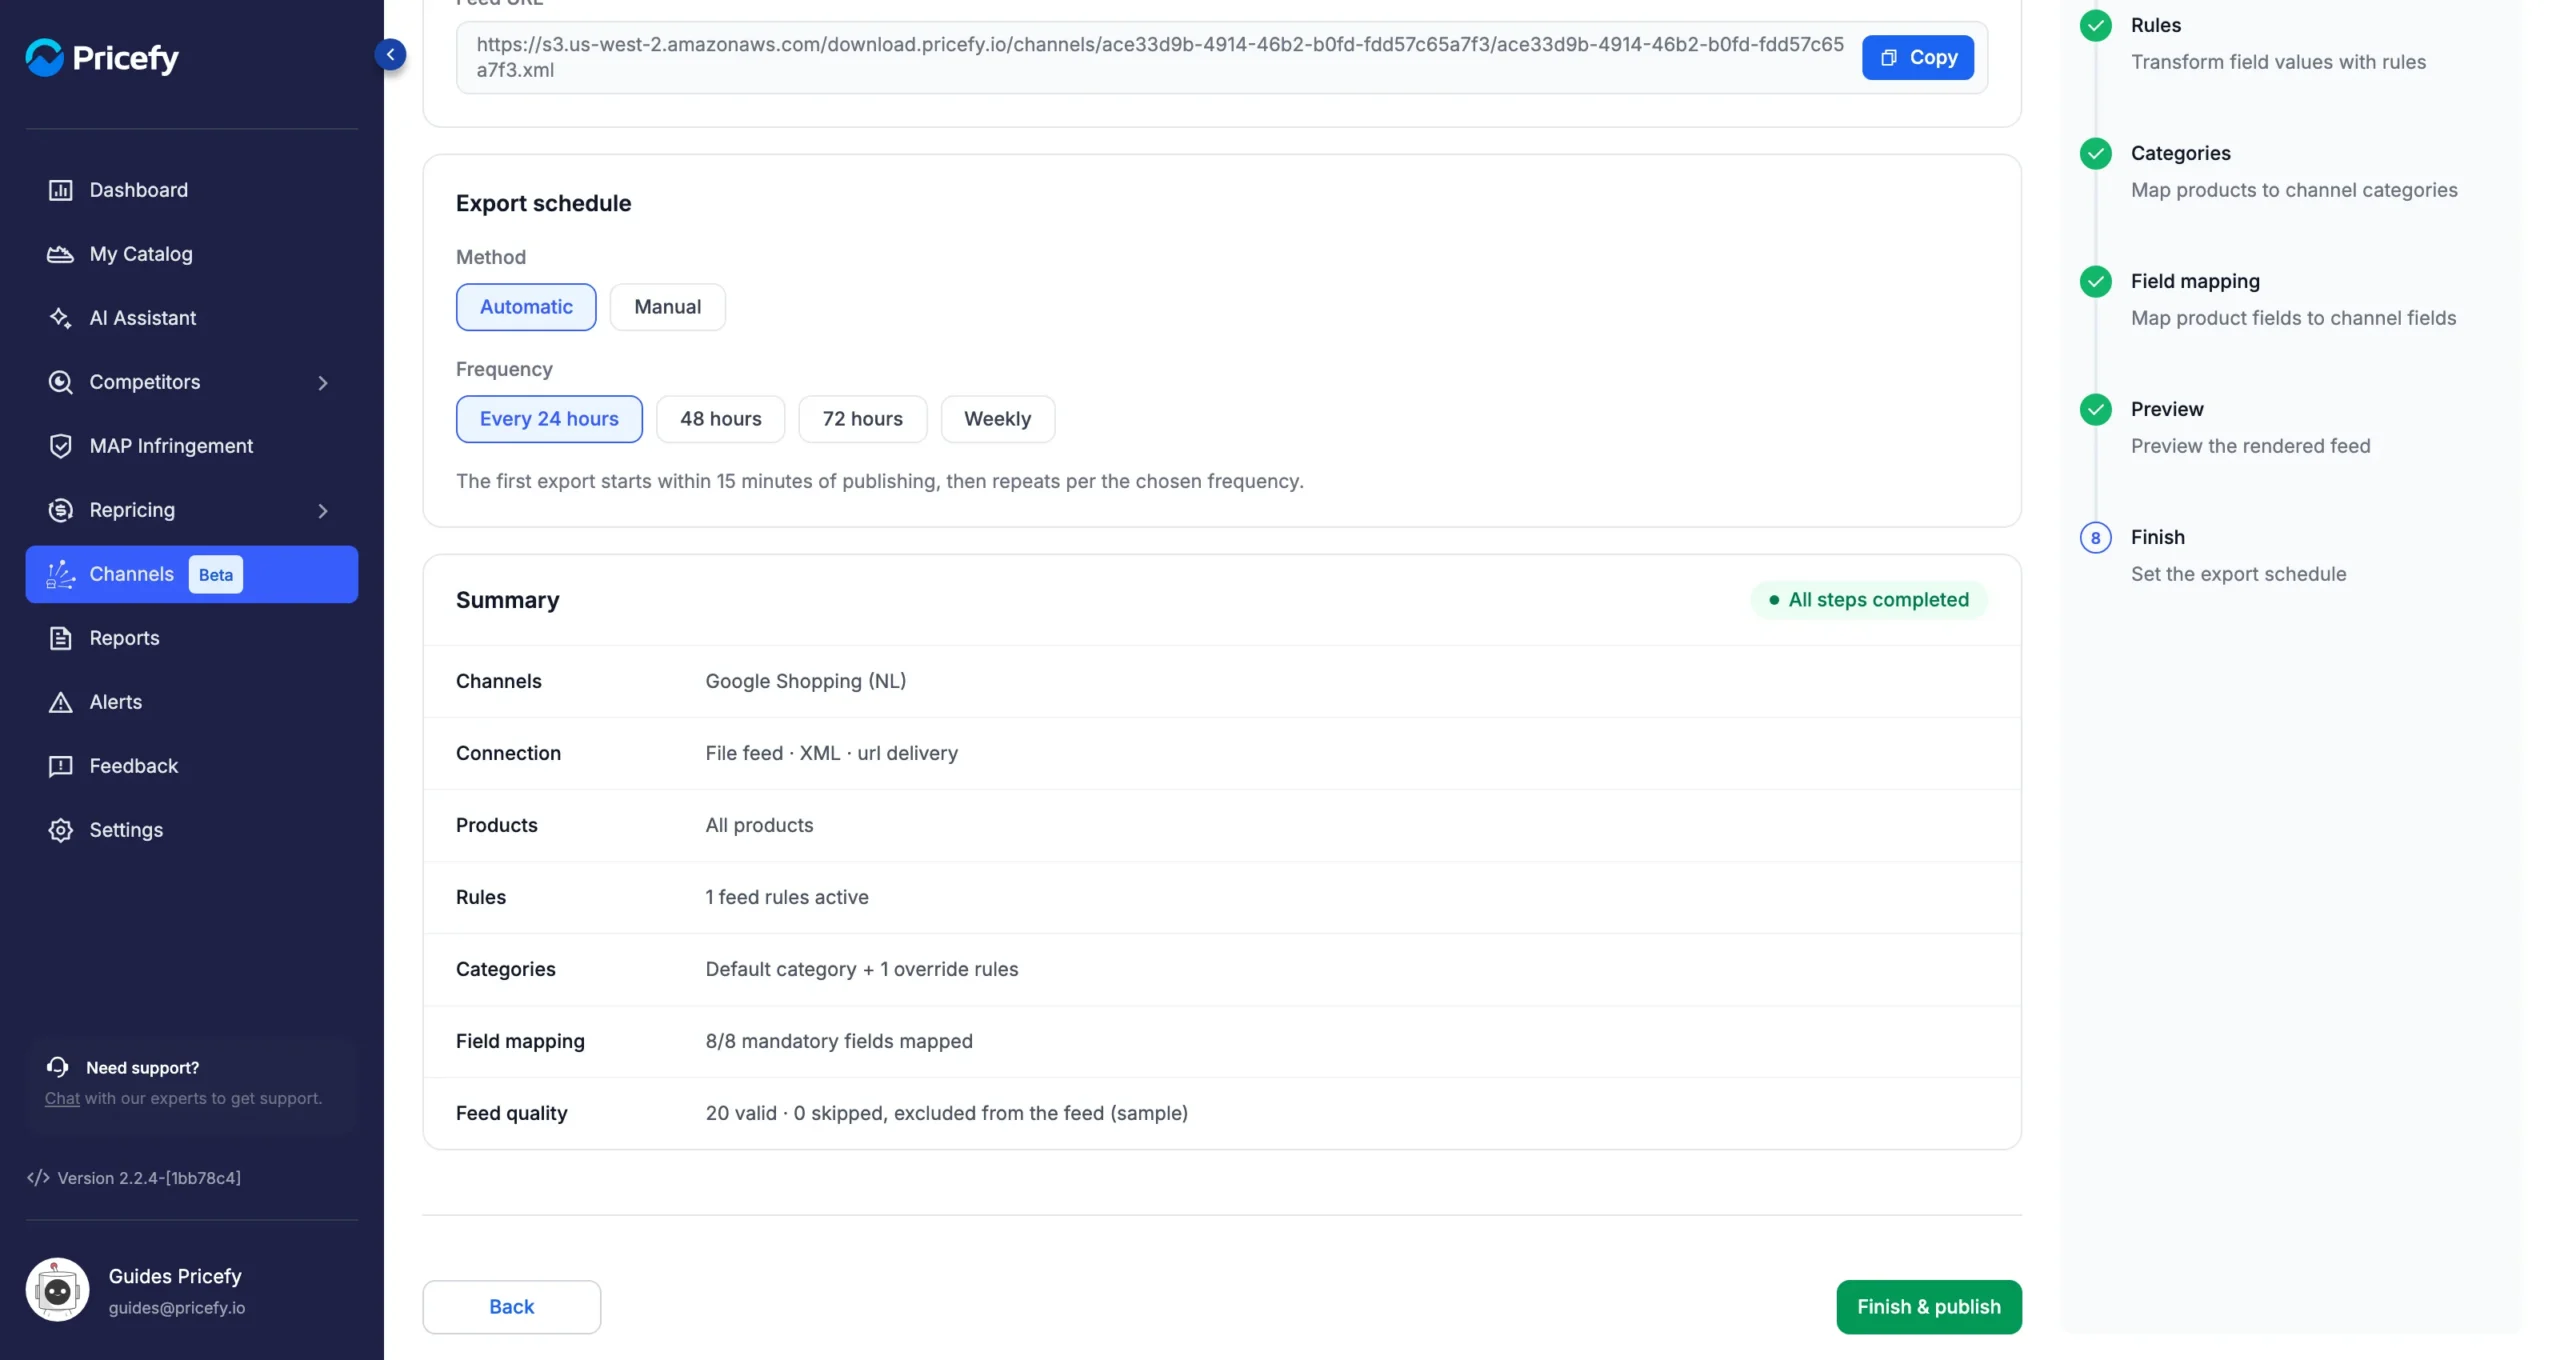
Check the Summary — one line per step, plus a Feed quality check on a sample of your products. Then click Finish & publish. The channel appears in your list as Active. To export it and follow the result, see How to export a product feed: now or on a schedule.
Good to know
- With the Manual method, remember to run Export Now after publishing: the feed file doesn’t exist until the first export.
- You can change a channel later with Edit, except its destination: to export to a different one, create a new channel.
- Creating channels needs the Channel Manager edit permission, and the number of channels depends on your plan — see Channels: export your catalog as product feeds.